
How to Draw Snowy Letters
Block letter drawing with snow and ice effects is a creative way to transform ordinary lettering into frosty masterpieces.
Whether you’re designing winter-themed projects, holiday cards, or exploring unique lettering styles, this technique adds a magical, seasonal touch to your work.
In this guide, I’ll show you step-by-step how to bring icy textures and snowy details to life in your block letters. Get ready to embrace the chill and create stunning winter-inspired art!
Let’s grab some supplies and get started.
* Some of the links in this post may be affiliate links. This means I receive small commissions for purchases made through these links at no extra cost to you.
Art Supplies
- Thin black marker
- Paper or cardstock
- Markers
- Pencil
- Click Eraser, Pink Pearl Eraser
- White Gelly Roll pen
About Graffiti Art
Graffiti art is a vibrant and expressive form of visual creativity that has its roots in urban culture. Known for bold colors, dynamic shapes, and stylized lettering, graffiti often transforms simple words into intricate works of art.
Originally associated with street art and self-expression, it has evolved into a respected art form embraced by artists worldwide. Whether it’s on a wall, canvas, or digital medium, graffiti lettering showcases the power of personal style and artistic freedom.
Block Letter Sketch Practice
Doing a quick practice sketch session is a great way to warm up and work through some of your ideas.
Or, to generate new ideas and designs for your artwork. You can practice drawing individual letters or words. And it only takes a few minutes to do. Here’s how…
- Get some paper and something to sketch with (pencil, pen, marker, etc.)
- Pull up some reference photos of block letters
- Set a timer for three or five minutes
Then sketch out as many letters or words as you can before the timer runs out. You can also sketch until your paper is filled instead of setting a timer. Either way is fine, but be sure to keep your sketches quick and loose.
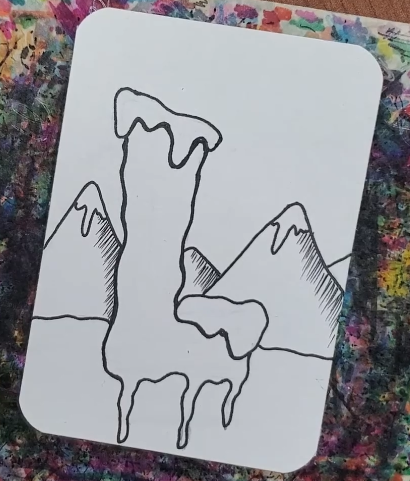
Block Letter Drawing with Snow – Step by Step How to Draw
Today I’ll be using a letter L for the tutorial. This same process can be used for any letter or word.
Practicing on individual letters is a great way to save time and work through ideas.
I decided to do this drawing because I had an idea for a bigger piece that I’m going to be making for a graffiti challenge.
This drawing was done on an artist trading card but you can use any size and type of paper.
Step 1: Guidelines
Let’s begin our drawing with some basic guidelines. Start by drawing your letter with a single line, similar to how you would write out the letter in a note.
But this time think about how the letter flows. Pay attention to the size, angles, and length of each section of your letter.
I’m doing the letter L, but you can use this same method for any letter of the alphabet.
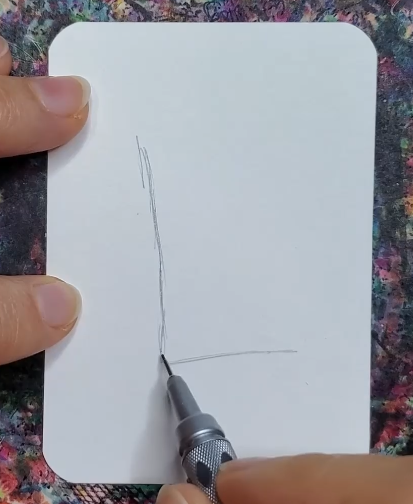
When drawing your guidelines you want your letter to look interesting. So keep that in mind as you’re drawing your letter.
Step 2: Sketch
After you’re happy with how your letter looks and is drawn out you can add the thickness to your letter.
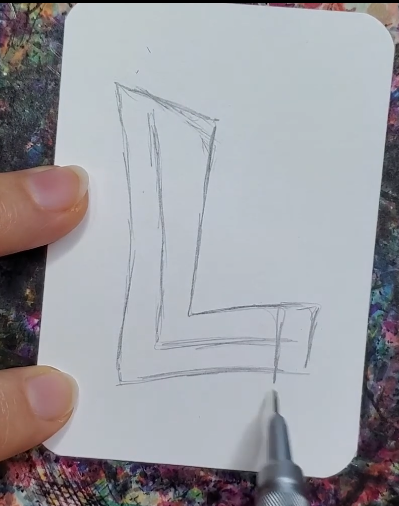
Use your guidelines to help draw out the letter and how it should flow. Pay attention to the areas where the letter gets wider or more narrow. Be intentional about how you draw it.
Step 3: Extra Details (snow and ice)
To finish up the letter add some snow to the top. Keep the lines smooth and rounded. Avoid pointed edges.
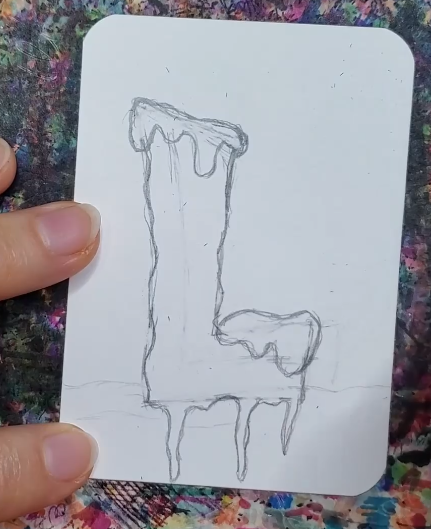
You can also add some icicles to the bottom of the letter. When drawing these, vary the lengths and sizes so they’re not all the same. That will make your letter look more interesting.
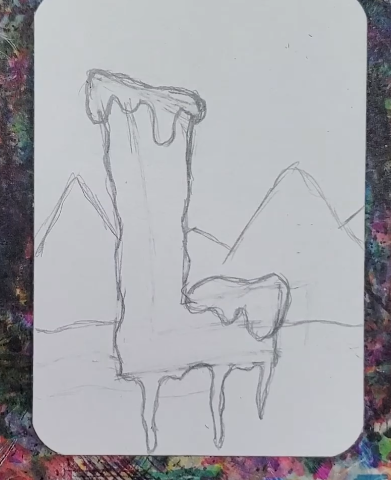
Finish up your sketch by adding a background. For this drawing I added some mountains that will add a bit of contrast to the colors I’ll be using.
Snowy Block Letter Outline
After your sketch is finished and you’ve gotten all the details worked out, you can add an outline to your drawing using a black pen.
You can make your lines thick or thin. Or you could use a variation of line weights.
Another option is to use a color other than black.
To create your outline, simply trace over your pencil lines with a pen or marker.
When you’re finished with your outline you can use a block eraser to remove any extra lines.
Block Letter Drawing with Snow and Ice – Markers
After you have your outline finished it’s time to add some color. I’m using markers today but any medium will work for this.
Begin by choosing two or three markers for the letter. In this drawing I’m using blue because I want it to look like ice.
Add the lightest blue to the bottom of the letter. Then add the medium blue to the middle and the darkest blue to the top. Use the lighter marker or a colorless blender to smooth out the transitions where the two colors meet.
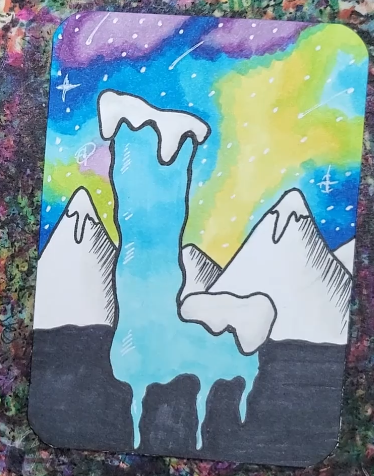
You can use a light gray to add some shadows to the snow caps.
For the background, use some night bright colors along with some darker blues to create the sky.
A white Gelly Roll pen can be used to add highlights.
Final Thoughts and Next Steps
Now that you’ve made your block letter drawing with snow and ice, what’s the next step?
If you want to improve your drawing skills you simply need to practice. The more you practice the better you will get.
This can be done with only a few minutes a day if you’re consistent. You don’t have to spend hours on your drawings
Learn more about drawing graffiti art with our free guide.
Get your FREE Graffiti Guide and learn the steps to creating your own graffiti art.
