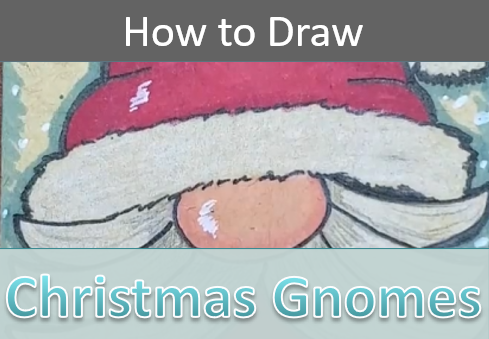
Step by Step Santa Gnome Drawing
If you’ve ever wanted to add a touch of whimsy to your holiday art, learning how to draw Christmas gnomes is the perfect place to start!
These festive little characters, with their fluffy beards, cozy hats, and cheerful personalities are fun for artists of all levels.
In this tutorial, we’ll go step-by-step so you can create your own charming gnome drawings just in time for the holidays.
Let’s grab some supplies and get started on some Christmas gnome drawings.
* Some of the links in this post may be affiliate links. This means I receive small commissions for purchases made through these links at no extra cost to you.
Art Supplies
- Thin black marker
- Paper or cardstock
- Markers
- Pencil
- Click Eraser, Pink Pearl Eraser
- White Gelly Roll pen
A Little History of Gnomes
Gnomes have been around for centuries in European folklore, originally seen as earth spirits who lived underground and guarded treasures. In the 1800s, they became popular as garden ornaments in Germany, symbols of good luck said to help plants grow.
The Christmas gnome we know today comes from Scandinavian legends about the Tomte or Nisse. Tiny helpers who protected farms and brought good fortune (especially if you left them a bowl of porridge on Christmas Eve!).
Over time, they became part of holiday traditions, transforming into the cozy, red-hatted gnomes we love to draw today.
Christmas Gnomes Sketch Practice
Doing a quick sketch warmup is completely optional, but is a great exercise. And it’s easy to do.
Here’s how:
- Get some paper and something to sketch with (pencil, pen, marker, etc.)
- Pull up some reference photos of Christmas, Winter, or Santa Gnomes
- Set a timer for three or five minutes
Then simply sketch out as many Christmas gnomes as you can before the timer goes off. Keep your lines loose and quick. Don’t worry about small details. Just capture the basic concepts of the sketches.
Another option is to keep sketching until your paper is filled. Just make sure you don’t spend too much time on the exercise. It’s meant to be quick.
Doing this is a great way to get warmed up and start working through some rough ideas for your drawing.
How to Draw Christmas Gnomes Step by Step
The best way to begin any drawing is by sketching out some simple shapes and guidelines to get you started. So that’s what we’ll be doing with this drawing.
Laying out some guidelines will help you get an idea of how big the overall drawing will be and if the placement is good on your paper. This allows you to correct any mistakes before spending too much time on your drawing.
I’m using an artist trading card (ATC) for my drawing, but you can use any size paper you want. I also used toned paper for this drawing. But white will work well too.
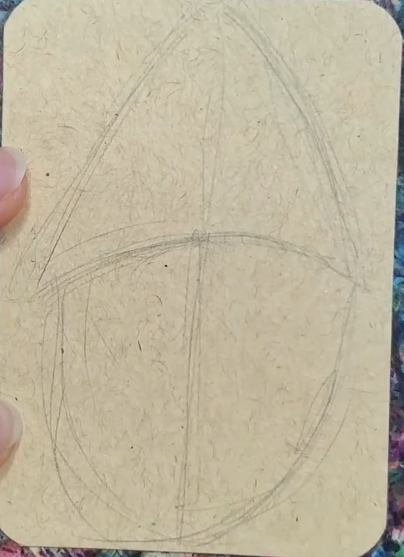
Step 1: Basic Shapes
Start by drawing an oval for the head. And then a cone shape for the hat. It doesn’t have to be perfect. These are just guides to help make the Santa Gnome drawing a little easier.
You can also add a line of symmetry down the center.
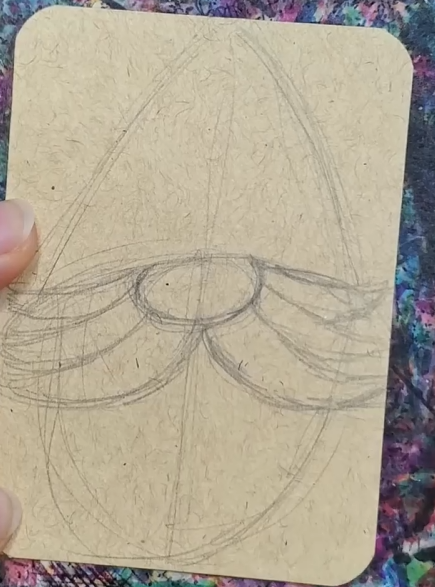
Step 2: Draw the Face
Next, draw a circle or oval for the nose. I like to draw the nose right under the edge of his hat.
Then add his facial hair. There are lots of different ways you can draw this. You could add a mustache and a beard. Or just draw one or the other. And there are many different ways to draw each of those.
So as you can see, it’s really easy to vary your Christmas gnome drawing to make it look different.
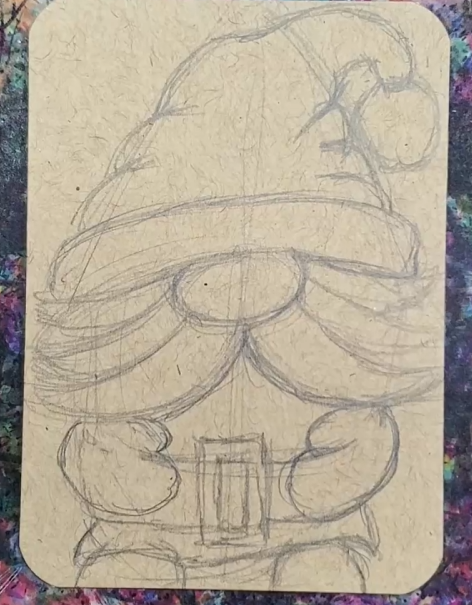
Step 3: Draw the Body
To finish up the sketch we need to draw his body and hat. Since we are drawing a Santa gnome, we need to give him a Christmas hat.
Start by drawing the band at the top of his face. Make sure you curve the lines. Then add the top of the hat using your cone shape as a guide. Don’t forget to add the little ball at the end.
Then add in a couple of mittens, a belt, and some boots.
Christmas Gnomes Outline
After you have your Christmas gnome all sketched out and you’re satisfied with how it looks, you can add an outline with a black pen or marker.
Simply trace over any pencil lines that you want to keep. You can make your lines thin or thick. Or you could vary the line weight.
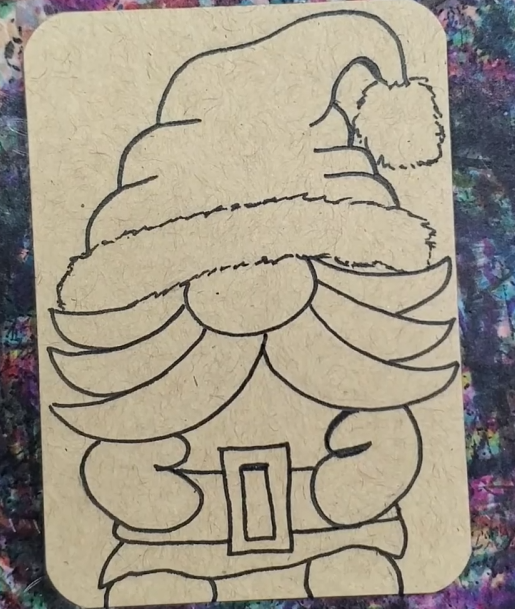
You could also try using a different color other than black for your Christmas gnome outline.
When your outline is finished, use a big eraser to clean up your drawing and remove any extra pencil lines.
How to Draw Santa Gnomes with Markers
The final step is to add in some color. I like using markers for my drawings but you can use any medium for this.
Begin by finding two or three red markers that are similar in color. If you’re using two, find a light and a dark red. If you’re using three markers, you’ll need a light, dark, and mid tone value.
Start by filling in one area with your lightest red color. Then use one that is slightly darker to add in some areas of shadow. If using three markers, do this again for the darkest color.
By using more than one marker for each color you’ll be able to easily create some depth in your drawing.
Do the same thing for the rest of the drawing. For the areas that are white you can use a light gray to add in some shadows.
I used a white colored pencil for my white areas since I did my Christmas Gnome drawing on tan paper.
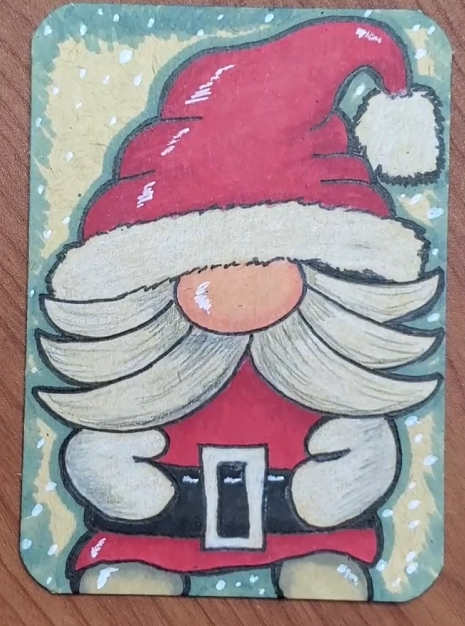
Finish your drawing by adding in a background with either a scene or some color and snow.
A white Gelly Roll pen can be used to add highlights.
Final Thoughts and Next Steps
That’s it for this easy art tutorial on how to draw a Christmas gnome. The best way to improve any skill is with practice. The more you practice, the better you will get. Even if it’s only for a few minutes a day.
You can save time by working small. That’s why I like using artist trading cards (ATCs) for my drawings. You can get more done in less time.
Doing a series of drawings on ATCs is a great way to improve several skills at once. Including your creativity. As I mentioned earlier there are many ways to take this simple drawing and change it up to create a different drawing.
Grab your FREE Guide to Better Art in 7 Days
