
Learn to Draw Easy Waves
Learning how to draw waves is easy and fun. We’ll show you step by step how to draw, outline, and color your wave drawings with markers.
Art and drawing are learned skills. They take consistent practice over time. The more you practice the better you will get.
If you enjoy creating art, you should pursue that passion, regardless of your skill level. Have fun and keep it relaxing. The more you enjoy your creative time the more you’ll do it.
Let’s grab our supplies and get ready to have some fun learning how to draw waves.
* Some of the links in this post may be affiliate links. This means I receive small commissions for purchases made through these links at no extra cost to you.
Art Supplies
- Thin black marker
- Paper or cardstock
- Markers
- Pencil
- Click Eraser, Pink Pearl Eraser
- White Gelly Roll pen
Wave Sketch Practice
Doing a wave sketch exercise is a great way to warm up your drawing muscles and work through some rough ideas for your drawings. And it only takes a few minutes to complete.
Here’s how it’s done…
- Get some paper and something to sketch with (pencil, pen, marker, etc)
- Pull up some reference photos of waves
- Set a timer for three or five minutes
Then just do as many quick sketches of waves as you can before the timer goes off.
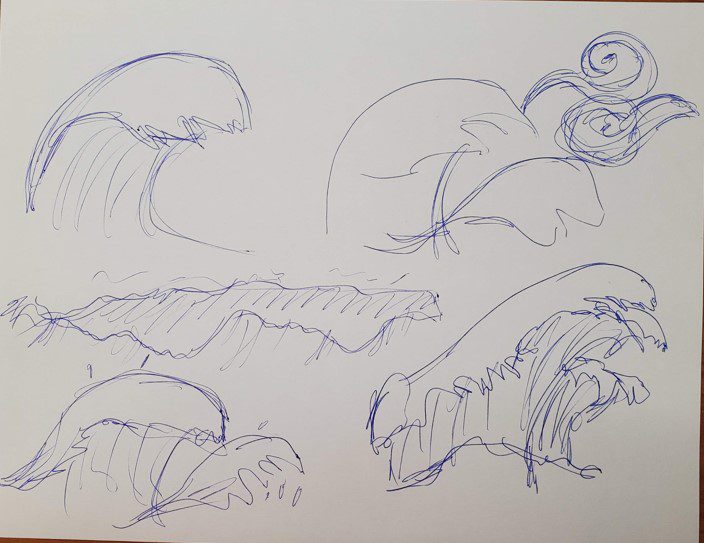
Another option is to do a series of quick sketches until you run out of room on your paper.
Either way is fine. Just keep your lines quick and loose. Your wave sketch exercise session should only take a few minutes to complete.
How to Draw Waves Easy
Learning how to draw waves is easy and fun. Let’s see step by step how to make some waves.
We’ll begin by drawing out the basic shape of the wave. This will help us get an idea of what the finished drawing will look like. As well as getting the placement correct.
The first thing we need to do is draw out the top curve of the wave. This is just a rough idea at this point. We’ll refine it a bit later.

Then sketch out the bottom edge of the crest, as well as the side where it curls under.
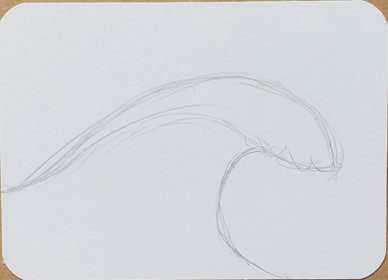
This is the basic shape of the wave. If you don’t like the shape or the placement of your drawing, now is the time to make changes.
Now we need to start refining our wave drawing and adding in some details. Let’s start by making the bottom edge uneven. There are a lot of different ways you can do this.
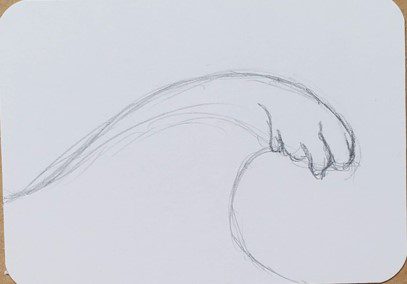
I like making each ripple look different, but you could make yours smoother or more uniform.
Continue working your way along the wave following the rough sketch you drew earlier.

Keep going until you reach the line for the top of your wave. You can also make the top line of the wave wavy.
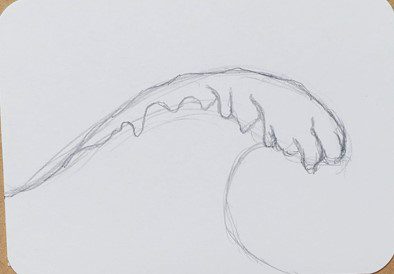
You can add some drops of water at the edges of the wave as well. I think they make the drawing more fun.

Finish your wave drawing by adding some line to the inside of the wave. This step is optional, and there’s a lot of other options as well. Don’t be afraid to add your own style to your wave drawings.
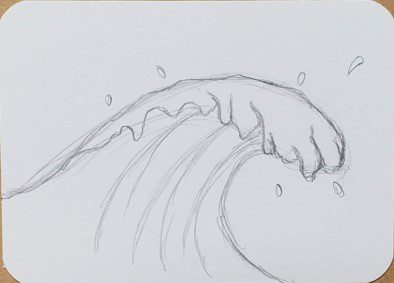
Make any changes before moving on.
Easy Wave Outline
Making a wave outline is easy. Simply trace over your pencil lines with a black pen or marker.
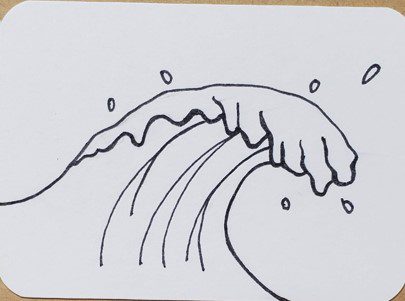
Your lines can be thick or thin. Or you can make your wave outline using a variety of line weights.
Just do whatever fits your artistic style. You could also try using a color other than black. Maybe try using blue or green instead.
If you’re not sure what your style is, don’t worry. It will develop over time with some practice.
How to Draw Waves with Markers
Learning how to draw waves with markers is easier than you might think. And there’s really only a few things you need to keep in mind.
First, if you want to be able to blend your colors together you need to use alcohol based markers. Bic, Sharpie, and Copic for example. As well as many others.
Second, you need to work while the colors are still wet or they won’t mix together. This isn’t a big deal. Just make sure you work on a section at a time.
Third, you need to use colors that are similar to each other if you want to create a smooth transition of color. If your markers are too different they will leave a harder edge.
Hard edges are fine if that’s the look you’re going for. But if it’s not, follow the above guidelines to create smooth transitions of color.
You should also avoid filling in areas with one solid color. This will create flat, boring, works of art. Again, unless that’s part of your style or the look you’re trying to achieve.
To add color to your wave you can use any colors you want. All waves don’t have to be blue or aqua. You could try pink, purple, or yellow.
The traditional blue was used for this example, which included three different markers. I used light blue, medium blue, and dark blue.
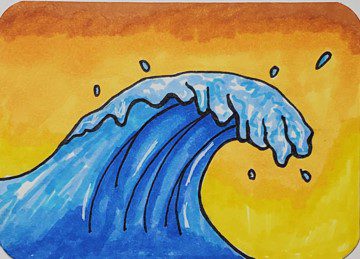
White can be added using a Gelly Roll pen.
For the background a sunset was added using yellow and orange. Take a look at our step by step tutorial on How to Draw a Sunset with Markers.
Final Thoughts and Next Steps
Now that you know how to draw waves, what’s the next step? If you want to get better at art and drawing you need to practice.
The more you practice the better you will get. This doesn’t mean you have to draw for hours a day to see results from your efforts. Consistently drawing for a few minutes every day will add up.
Keep things relaxing and enjoyable so you’ll look forward to your creative time.
If you want to get really good at drawing waves, challenge yourself to making a series of them over the next week. Your creativity will improve along with your art and drawing skills.
Grab your FREE Guide to Better Art in 7 Days
