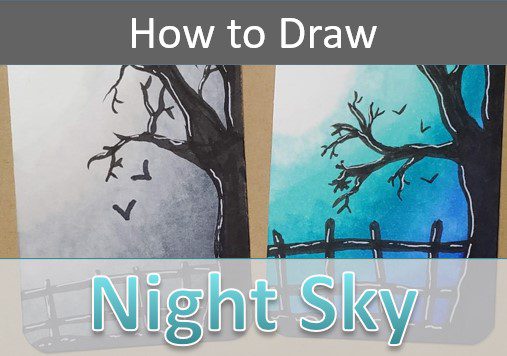
Learning how to draw a night sky with markers is really easy and lots of fun. I’ll show you how in this simple step by step art tutorial that’s perfect for beginners.
These cute drawings make wonderful artist trading cards, especially around the fall season when leaves are falling and the trees are bare.
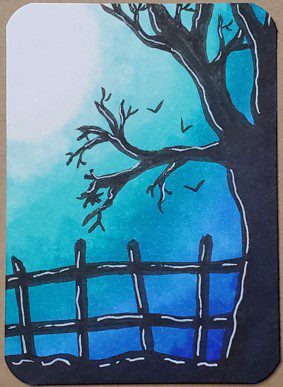
We’ll be adding trees and fences to our night sky backgrounds. But you’re certainly not limited to only those images. Your only limitation is your own imagination.
Let’s grab some supplies and get ready to learn how to draw a night sky with markers.
* Some of the links in this post may be affiliate links. This means I receive small commissions for purchases made through these links at no extra cost to you.
Art Supplies
- Thin black marker
- Paper or cardstock
- Markers
- Pencil
- Click Eraser, Pink Pearl Eraser
- White Gelly Roll pen
Benefits of this Lesson
Doing this type of drawing is great for learning to use value. And improving your marker skills.
You’ll get some practice at choosing the right colors and creating smooth transitions.
Night Sky Sketch Practice
If you want to warm up and practice a bit before starting your night sky drawing, do this quick sketch exercise.
It’s fast and easy. Here’s what you do:
- Get some paper and something to sketch with (pencil, pen, marker, etc.)
- Pull up some reference photos of fall trees
- Set a timer for three or five minutes
Then simply sketch out as many trees as you can. Keep in mind the type of trees you might want to add to your night sky drawing.
This exercise should only take about three to five minutes. Keep your sketches loose and quick.
How to Draw a Night Sky with Markers (step by step)
Step 1: Choose Your Colors
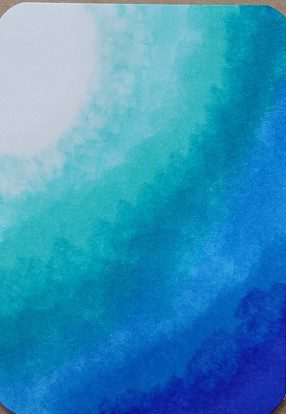
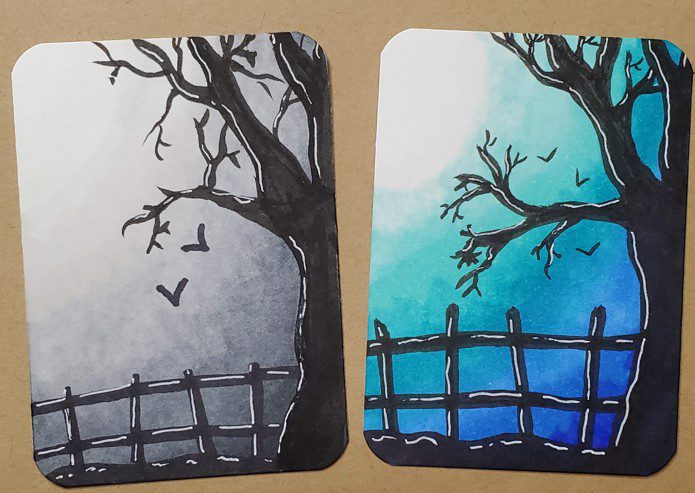
For this drawing we’re going to use a limited color palette. Because we are drawing a sky at night, we want to stick with grays or cool colors (blue and purple look nice).
For this example I used four different blue markers after testing them on scrap paper first. As well as a colorless blender.
You want to test your markers to be sure they’re going to blend together smoothly. Or at least as much as needed for the look you’re going for.
I’m using artist trading cards for the drawings in this tutorial. If you’re not familiar with them, check out our lesson on Getting Started with Artist Trading Cards (ATCs). They’re an amazing time saver.
Step 2: Draw Background
The first thing we need to do is mark where the moon will be. This part of our paper will be left white. You can draw this out with your lightest marker from the colors you chose for your night sky drawing.
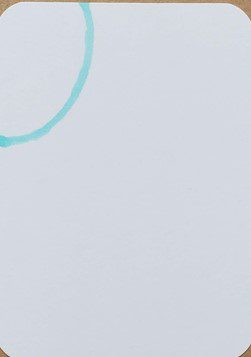
I made my moon in the upper left hand corner, but you can put your moon wherever you’d like. And you can make it as big or small as you want.
You can blend that area with a colorless blender, or use a marker that is light enough to not show the color.
Then fill in a small area of your paper around the line you made for your moon.
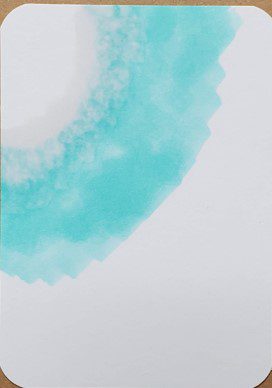
We’re going to make the sky darker as it gets further away from the moon. So get your next darkest color and add a small area of color next to the previous section.
And then use your lighter color to blend the area where your two colors overlap.
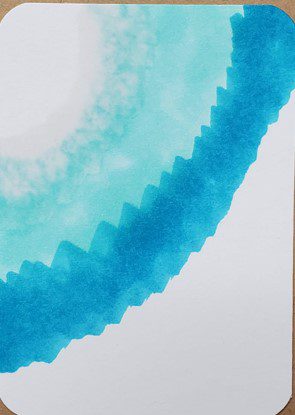
Continue working your way across your paper until you reach the opposite corner, which should be the darkest section. Work back and forth with your markers from lightest to darkest until you get the look you’re going for.
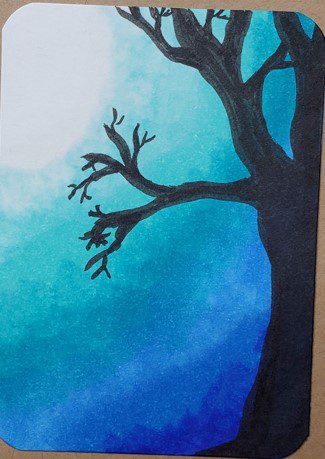
Step 3: Draw Foreground
After you’ve finished drawing out your night sky you can add some foreground images. I like adding a spooky tree and an old fence.
To draw a tree, start with the trunk. I like making it so it goes off the edge of the paper. Don’t make your lines too straight. You want to show some texture and curves in your tree.
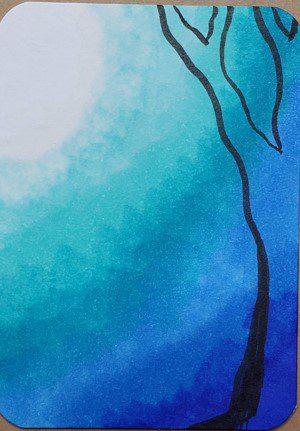
Check out How to Draw Spooky Trees for more help with this.
Fill the tree trunk in with black.

Then add some branches to your tree. A brush pen works really well for drawing out trees and branches. Click here to see the pens I like using.
Draw a section of ground along the bottom edge of your paper.

Then start drawing the fence. It’s easiest to draw the bottom rail first.

And then add the top rail. Just eyeball where they should be placed.
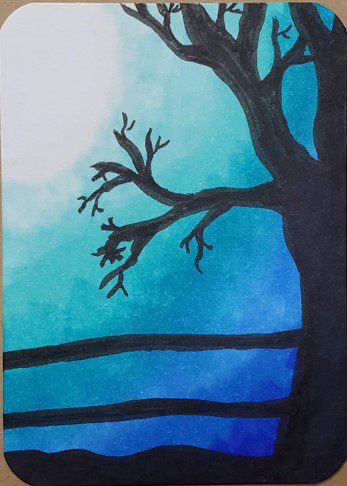
Finish up the fence by adding the posts. I like making them crooked and uneven.
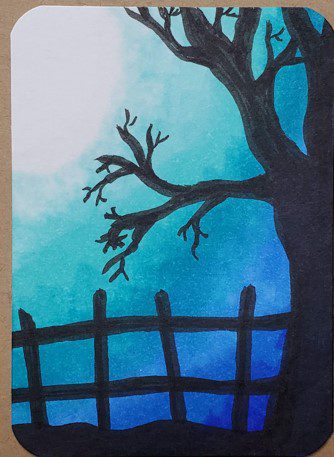
You can add some bats or other critters too.
A white Gelly Roll pen can be used to add highlights.
Tips for Using Markers to Draw
When choosing the right markers for your drawings you’ll need to keep a few things in mind.
First, if you want to be able to blend your colors together you need to use alcohol based markers. Bic, Sharpie, and Copic for example. As well as many others.
Second, you need to work while the colors are still wet or they won’t mix together. This isn’t a big deal. Just make sure you work on a section at a time.
Third, you need to use colors that are similar to each other if you want to create a smooth transition of color. If your markers are too different they will leave a harder edge.
Final Thoughts and Next Steps on Drawing a Night Sky with Markers
Now that you know how to draw a night sky with markers, what should you do next? Since art and drawing are learned skills, the next thing is to practice.
The more you practice the better you will get. So the obvious next step is to practice. It’s helpful to do a series of the same type of drawing.
Try making several more night sky drawings. You can experiment with different colors. Or play around with what you add to the foreground. Have fun with it and try new things.
Grab your FREE Guide to Better Art in 7 Days

Great tutorial! The marker blending tips and adding a silhouetted tree or fence make this night sky idea feel both creative and achievable.
Thank you! I’m so glad you enjoyed the tutorial.