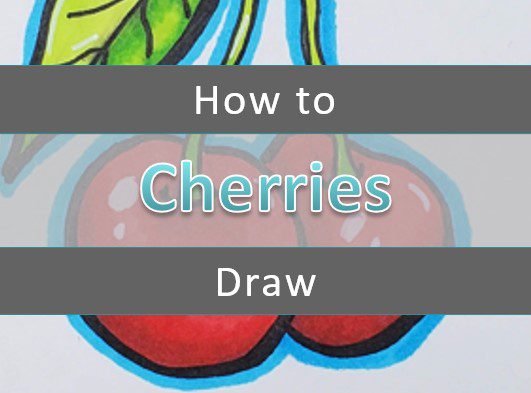
Learn to Draw Cherries (Easy & Fun)
Learning how to draw cherries step by step is easy and fun. We’ll show you how to draw, outline, and color your cherry drawings with markers.
Drawing and art are skills anyone can learn. Nobody was born with the ability to draw well.
Learning to draw, or create art, takes practice and repetition. The more you draw the better you will get.
And the more you enjoy your creative time, the more you’ll look forward to it. So make sure you’re keeping things relaxing and enjoyable.
Now let’s grab our supplies and get ready to have some fun learning how to draw cherries.
* Some of the links in this post may be affiliate links. This means I receive small commissions for purchases made through these links at no extra cost to you.
Art Supplies
- Thin black marker
- Paper or cardstock
- Markers
- Pencil
- Click Eraser, Pink Pearl Eraser
- White Gelly Roll pen
Cherries Sketch Practice
Doing a cherry sketch session is a great way to warm up and work through some basic ideas for your artwork.
And it only takes a few minutes to complete. Here’s how to do a cherries sketch practice exercise.
- Get some paper and something to sketch with (pencil, pen, marker, etc)
- Pull up some reference photos of cherries
- Set a timer for three or five minutes
Then simply sketch as many cherries as you can. Don’t get too specific or worry about the little details.
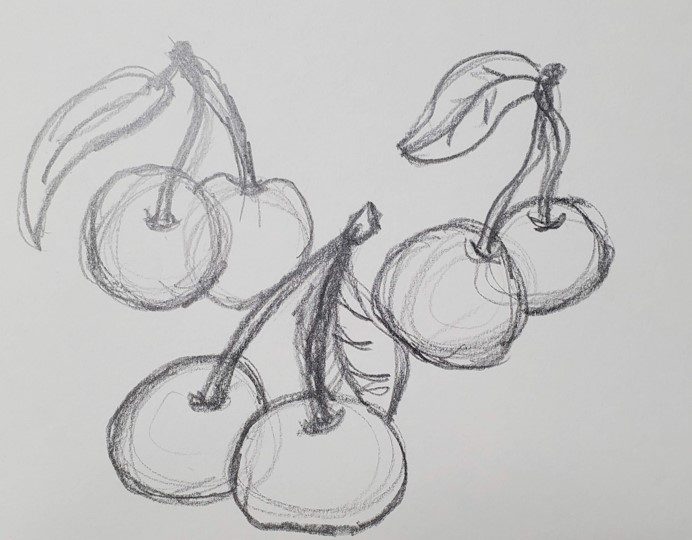
Focus on the size, shapes, and proportions of the cherries. This is a great exercise to help you to really see what you’re drawing.
Another option is to do as many quick sketches as you can before you run out of room on your paper.
For more information on warming up check out our Tutorial on The Benefits of Warm Up Exercises.
How to Draw Cherries Step by Step (easy)
Learning how to draw cherries step by step is really easy if you break things down into simple shapes. Let’s look at those steps to making an easy cherries drawing.
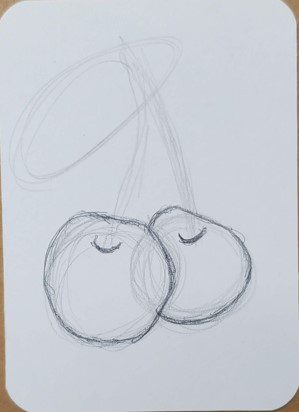
Step 1: Basic Shapes
Beginning with some basic shapes is a great way to start your drawings. It helps you get things laid out where they need to be.
And it helps make your drawings less intimidating. It’s a great way to get past the blank page part of drawing… or for some people, not drawing.
Begin by drawing a couple of circles for the cherries, lines for the stem, and an oval for the leaf.
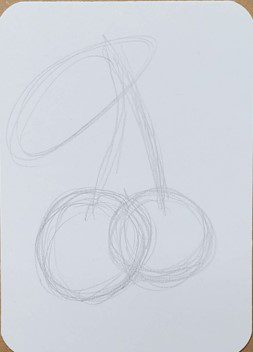
Before moving on, make sure you’re satisfied with the size and placement of your cherries.
Step 2: Add Details
Now we need to start drawing in the details. Let’s begin with the cherry that is closest to us.
Draw a small curved line for the indent where the stem comes out of the cherry.
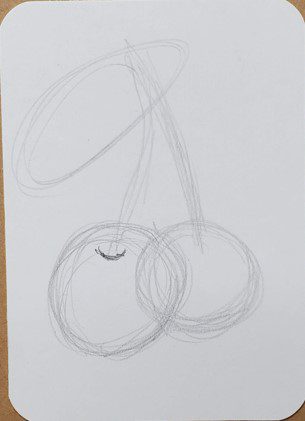
Then draw the outside shape of the cherry. Most cherries are not perfect circles, so don’t feel like you need to draw them that way.

Follow the same process for the second cherry. Be sure to use overlapping in your drawing to show depth.
Next we’ll work on drawing the stems. Start with the one closest to us again.
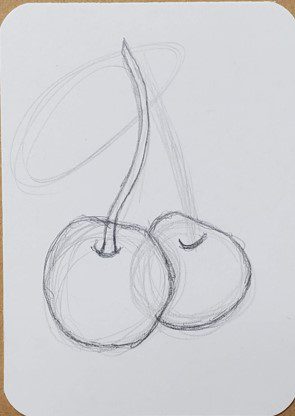
And then draw the stem for the second cherry.

Now draw the leaf, or multiple leaves if you prefer. Start with the center line of the leaf.
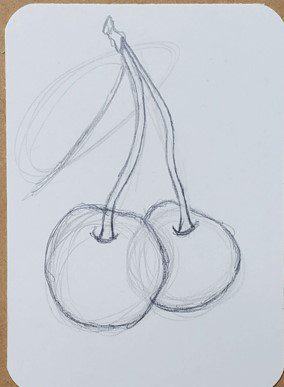
Then draw the outside shape of the leaf. There’s a lot of different ways you can do this, with various levels of detail.
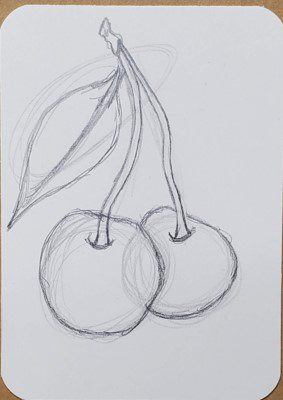
Finish up your cherries by adding the veins to the inside of the leaf.
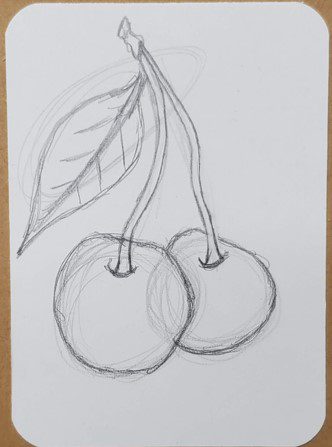
Clean up your drawing and make any changes before moving onto the next step.
Cherries Outline
Making a cherry outline is really easy to do. All you have to do is trace over the pencil lines that you want to keep with a black pen or marker.
You can make your lines thin, thick, or a variation of the two. Just make your lines however you want that fits your artistic style.
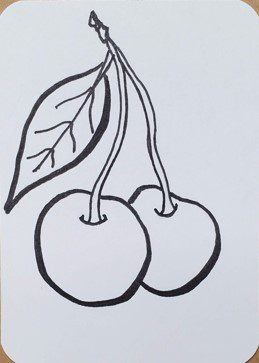
You could also use a color other than black for your cherries outline. Maybe try using red, brown, or gray. Experiment and try different things to see what fits your style.
If you’re not sure what your style is, don’t worry. It will develop over time with practice and repetition.
When you’re finished with your outline use an eraser to clean up your drawing and remove any pencil lines.
How to Draw Cherries with Markers
Learning how to draw cherries with markers is really easy. But there are a few things you should keep in mind when using them.
First, if you want to be able to blend your colors together you need to use alcohol based markers. Bic, Sharpie, and Copic for example. As well as many others.
Second, you need to work while the colors are still wet or they won’t mix together. This isn’t a big deal. Just make sure you work on a section at a time.
Third, you need to use colors that are similar to each other if you want to create a smooth transition of color. If your markers are too different they will leave a harder edge.
When adding color to your cherries drawing you’ll want to use red, along with another marker for shading. You could use dark red, brown, gray, green, or another color for your shadows.
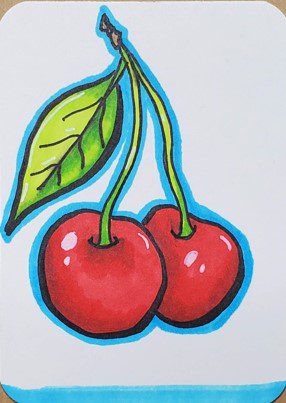
For the leaf and stem you can use light green and medium green. You’ll probably want to avoid hard edges from your colors. But, if that’s part of your style don’t avoid it.
A white Gelly Roll pen can be used for the highlights.
Final Thoughts and Next Steps
Now that you know how to draw cherries, what’s the next step? If you want to improve your art and drawing skills you need to practice.
The more you practice, the better you will get. Working on your artwork a little each day is a great approach. A few minutes every day will add up over time. And is more realistic for most people than trying to spend hours at a time creating art.
If you want to get really good at drawing cherries you can challenge yourself to do a series of drawings over the next week.
Your creativity will improve along with your drawing and art skills.
Grab your FREE Guide to Better Art in 7 Days
